The main functioning of the server is to allow devices to send fingerprints to it.
TOC
Install with Go
First install Go if you haven’t already. FIND is tested on Go version 1.5+.
$ git clone https://github.com/schollz/find.git
$ cd find
$ go get ./...
$ go build
Then to run,
$ ./find
-----+-----+-----+-----+-----+-----+-----+-----+-----+-----+-----+-----
   _________  _____
  / __/  _/ |/ / _ \  ______ _____  _____ ____
 / _/_/ //    / // / (_-< -_) __/ |/ / -_) __/
/_/ /___/_/|_/____/ /___|__/_/  |___/\__/_/

(version 2.X) is up and running on http://192.168.1.2:8003
-----+-----+-----+-----+-----+-----+-----+-----+-----+-----+-----+-----
MQTT support
Setup (Self-hosted servers)
Basically, right now you can only run mosquitto using a instance running from a configuration file created specifically by FIND. To get started, you’ll first need the latest copy of mosquitto:
wget http://repo.mosquitto.org/debian/mosquitto-repo.gpg.key
sudo apt-key add mosquitto-repo.gpg.key
cd /etc/apt/sources.list.d/
sudo wget http://repo.mosquitto.org/debian/mosquitto-wheezy.list
sudo apt-get update
sudo apt-get install mosquitto-clients mosquitto
Then goto your FIND folder and create a file (in the future I’ll have FIND do this automatically):
mkdir /path/to/find/mosquitto
touch /path/to/find/mosquitto/conf
Now, start mosquitto in the background:
mosquitto -c /path/to/find/mosquitto/conf -d
Now, you can startup FIND:
./find -mqtt ADDRESS:1883 -mqttadmin ADMIN -mqttadminpass ADMIN_PASS -mosquitto `pgrep mosquitto` -p :PORT ADDRESS:PORT
The ADDRESS and PORT is the address and port your using for FIND. The pgrep mosquitto is for getting the mosquitto PID, which is used to send SIGHUP to reload the passwd file. The ADMIN and the ADMIN_PASS are your secret name and password to access read/write access to every MQTT channel. Make sure these are not simple enough to guess.
That’s it!
Client (MQTT connections)
Register
To receive data from the FIND MQTT, follow these steps. First, register your group using the following:
curl -X PUT "https://ml.internalpositioning.com/mqtt?group=YOURGROUP"
where YOURGROUP is your group name. This command will tell FIND to add group level access to your own special MQTT channel. You’ll receive a message like:
{
    "message": "You have successfully set your password.",
    "password": "YOURPASSWORD",
    "success": true
}
The password is what you can use to access MQTT now. You can retrieve your password by using the same curl command. These passwords are completely random, and not hashed - so totally not guessable.
Subscribing
First make sure to register. To subscribe to your channel to see current locations, simply use the topic YOURGROUP/location/#, e.g.:
mosquitto_sub -h ml.internalpositioning.com -u YOURGROUP -P YOURPASSWORD -t "YOURGROUP/location/#"
Publishing Fingerprints
Currently, MQTT takes only a very specific type of fingerprint. Basically, to utilize the minimal MQTT byte size you have to compress the mac addresses and RSSI components.
To publish fingerprints, use the channel YOURGROUP/track/USERNAME for tracking or YOURGROUP/learn/USERNAME/LOCATION for learning. The body needs to be a multiple of 14 bytes where the first 12 bytes are the Mac address and the next 2 bytes is the RSSI value (absolute value). For example, if your detected routers are
"ab:cd:ef:gf:ij:kl":-32
"mn:op:qr:st:uv:wx":-3
then you’ll need to send the following as the body:
"abcdefgfijkl32mnopqrstuvwx 3"
Random Forest support
FIND can use random forests with an additional TCP server that handles Random Forest calculations. To use it, first install Python3 libraries:
apt-get install -y python3 python3-dev python3-pip
apt-get install -y python3-scipy python3-numpy
python3 -m pip install scikit-learn
Then run the Random Forests TCP server using
python3 rf.py --port 5009
Now you can run the FIND server using this server for the RF calculations with some new flags to tell the server which port is on:
./findserver -rf 5009
SVM support
Follow these instructions if you are running a FIND server and would like to add SVM to the machine learning routines.
Setup (Self-hosted servers)
FIND will automatically utilize libsvm once it is installed. Here are the instructions to install (you should run with root/sudo):
sudo apt-get install g++
wget http://www.csie.ntu.edu.tw/~cjlin/cgi-bin/libsvm.cgi?+http://www.csie.ntu.edu.tw/~cjlin/libsvm+tar.gz
tar -xvf libsvm-*.tar.gz
cd libsvm-*
make
cp svm-scale /usr/local/bin/
cp svm-predict /usr/local/bin/
cp svm-train /usr/local/bin/
Then just restart FIND! It will automatically detect whether its installed. When SVM is enabled, you will see SVM data along with the Naive-Bayes information.
Note: Currently FIND defaults to use the Naive-Bayes machine learning for the actual guesses. In my experience SVM is generally inferior, but this may depend on your location.
Filtering macs
There are some instances where you want to ignore most access points and use only a select few. You can now do this by starting the server with the -filter flag:
./findserver -filter macs.json
where the file, macs.json contains only the macs you want to use. For example, a macs.json could look like:
{
    "ac:86:74:6b:9b:80":true,
    "ac:86:74:6b:9b:60":true,
    "ac:86:74:6b:9b:a0":true
}
which would only do calculations based on those three access points.
Note: All access points are saved, even when -filter is enabled. However, calculations will only be performed using the ones specified in the filter file.
Install with Docker
This installation route will include mosquitto and SVM and Random Forests - no further configuration needed. Its based off the Ubuntu16 image, but that could be changed (except mosquitto is not bundled in earlier versions). This Dockerfile makes more sense to me since it reads more like a Makefile. It forwards port 18003 for FIND and port 11883 for mosquitto in the following examples.
Using hub.docker.com
$ docker pull schollz/find
$ docker run -it -p 18003:8003 -p 11883:1883 -v /path/to/host/data/folder:/data schollz/find
Using Dockerfile
$ git clone https://github.com/schollz/find.git && cd find
$ docker build -t finddocker .
$ docker run -it -p 18003:8003 -p 11883:1883 -v /path/to/host/data:/data finddocker
Plugins
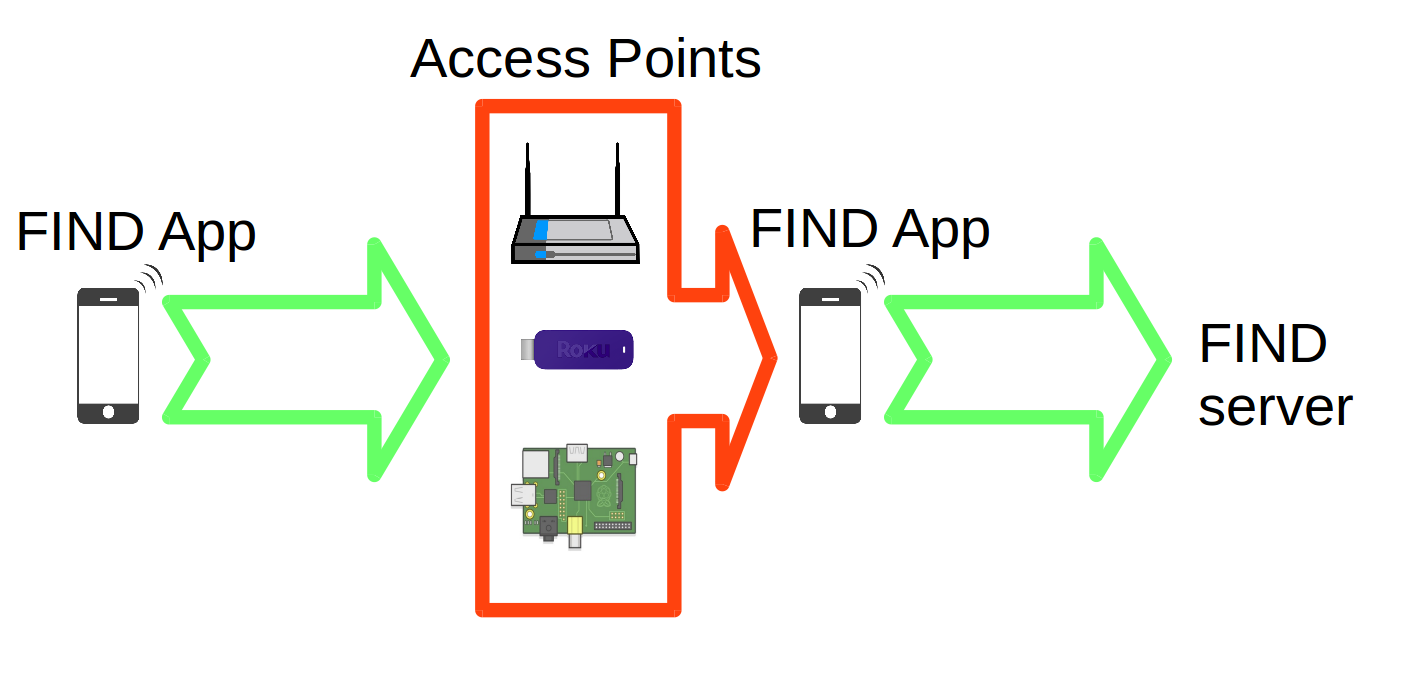
Using FIND without an app
It is possible to use FIND without an app, using the find-lf plugin.
Normally, the FIND APP allows an phone/device collect fingerprints from surrounding access points.
Using FIND-LF you can actually collect the fingerprints directly using a cluster of Raspberry Pis and you do not need a fingerprinting client (like an Android App). These Raspberry Pis then forward the individual signals to a FIND-LF server, which then forwards them normally to FIND server.
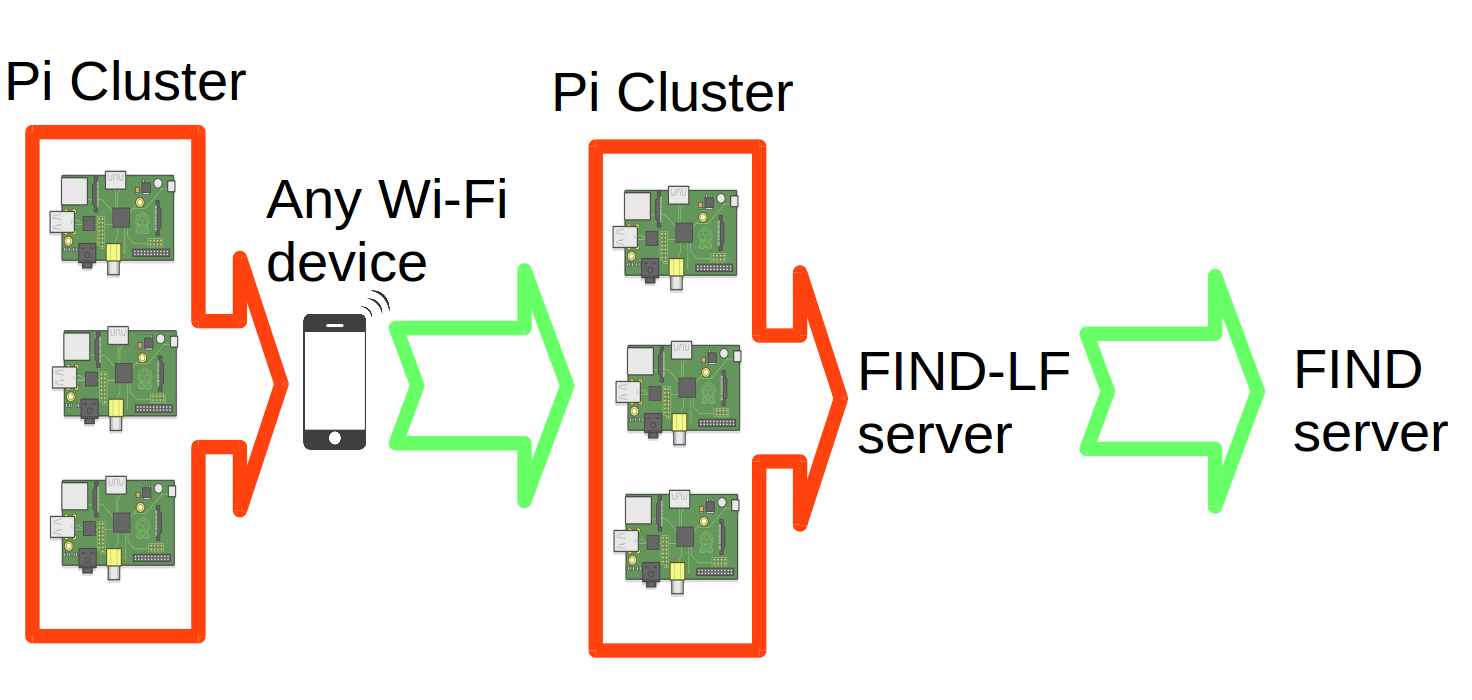
For more information, see the FIND-LF README.
Using FIND with a map
The find-map is a simple setup for projecting the current locations using GPS coordinates. For more information, see find-map README.
Home Automation
home-assistant.io
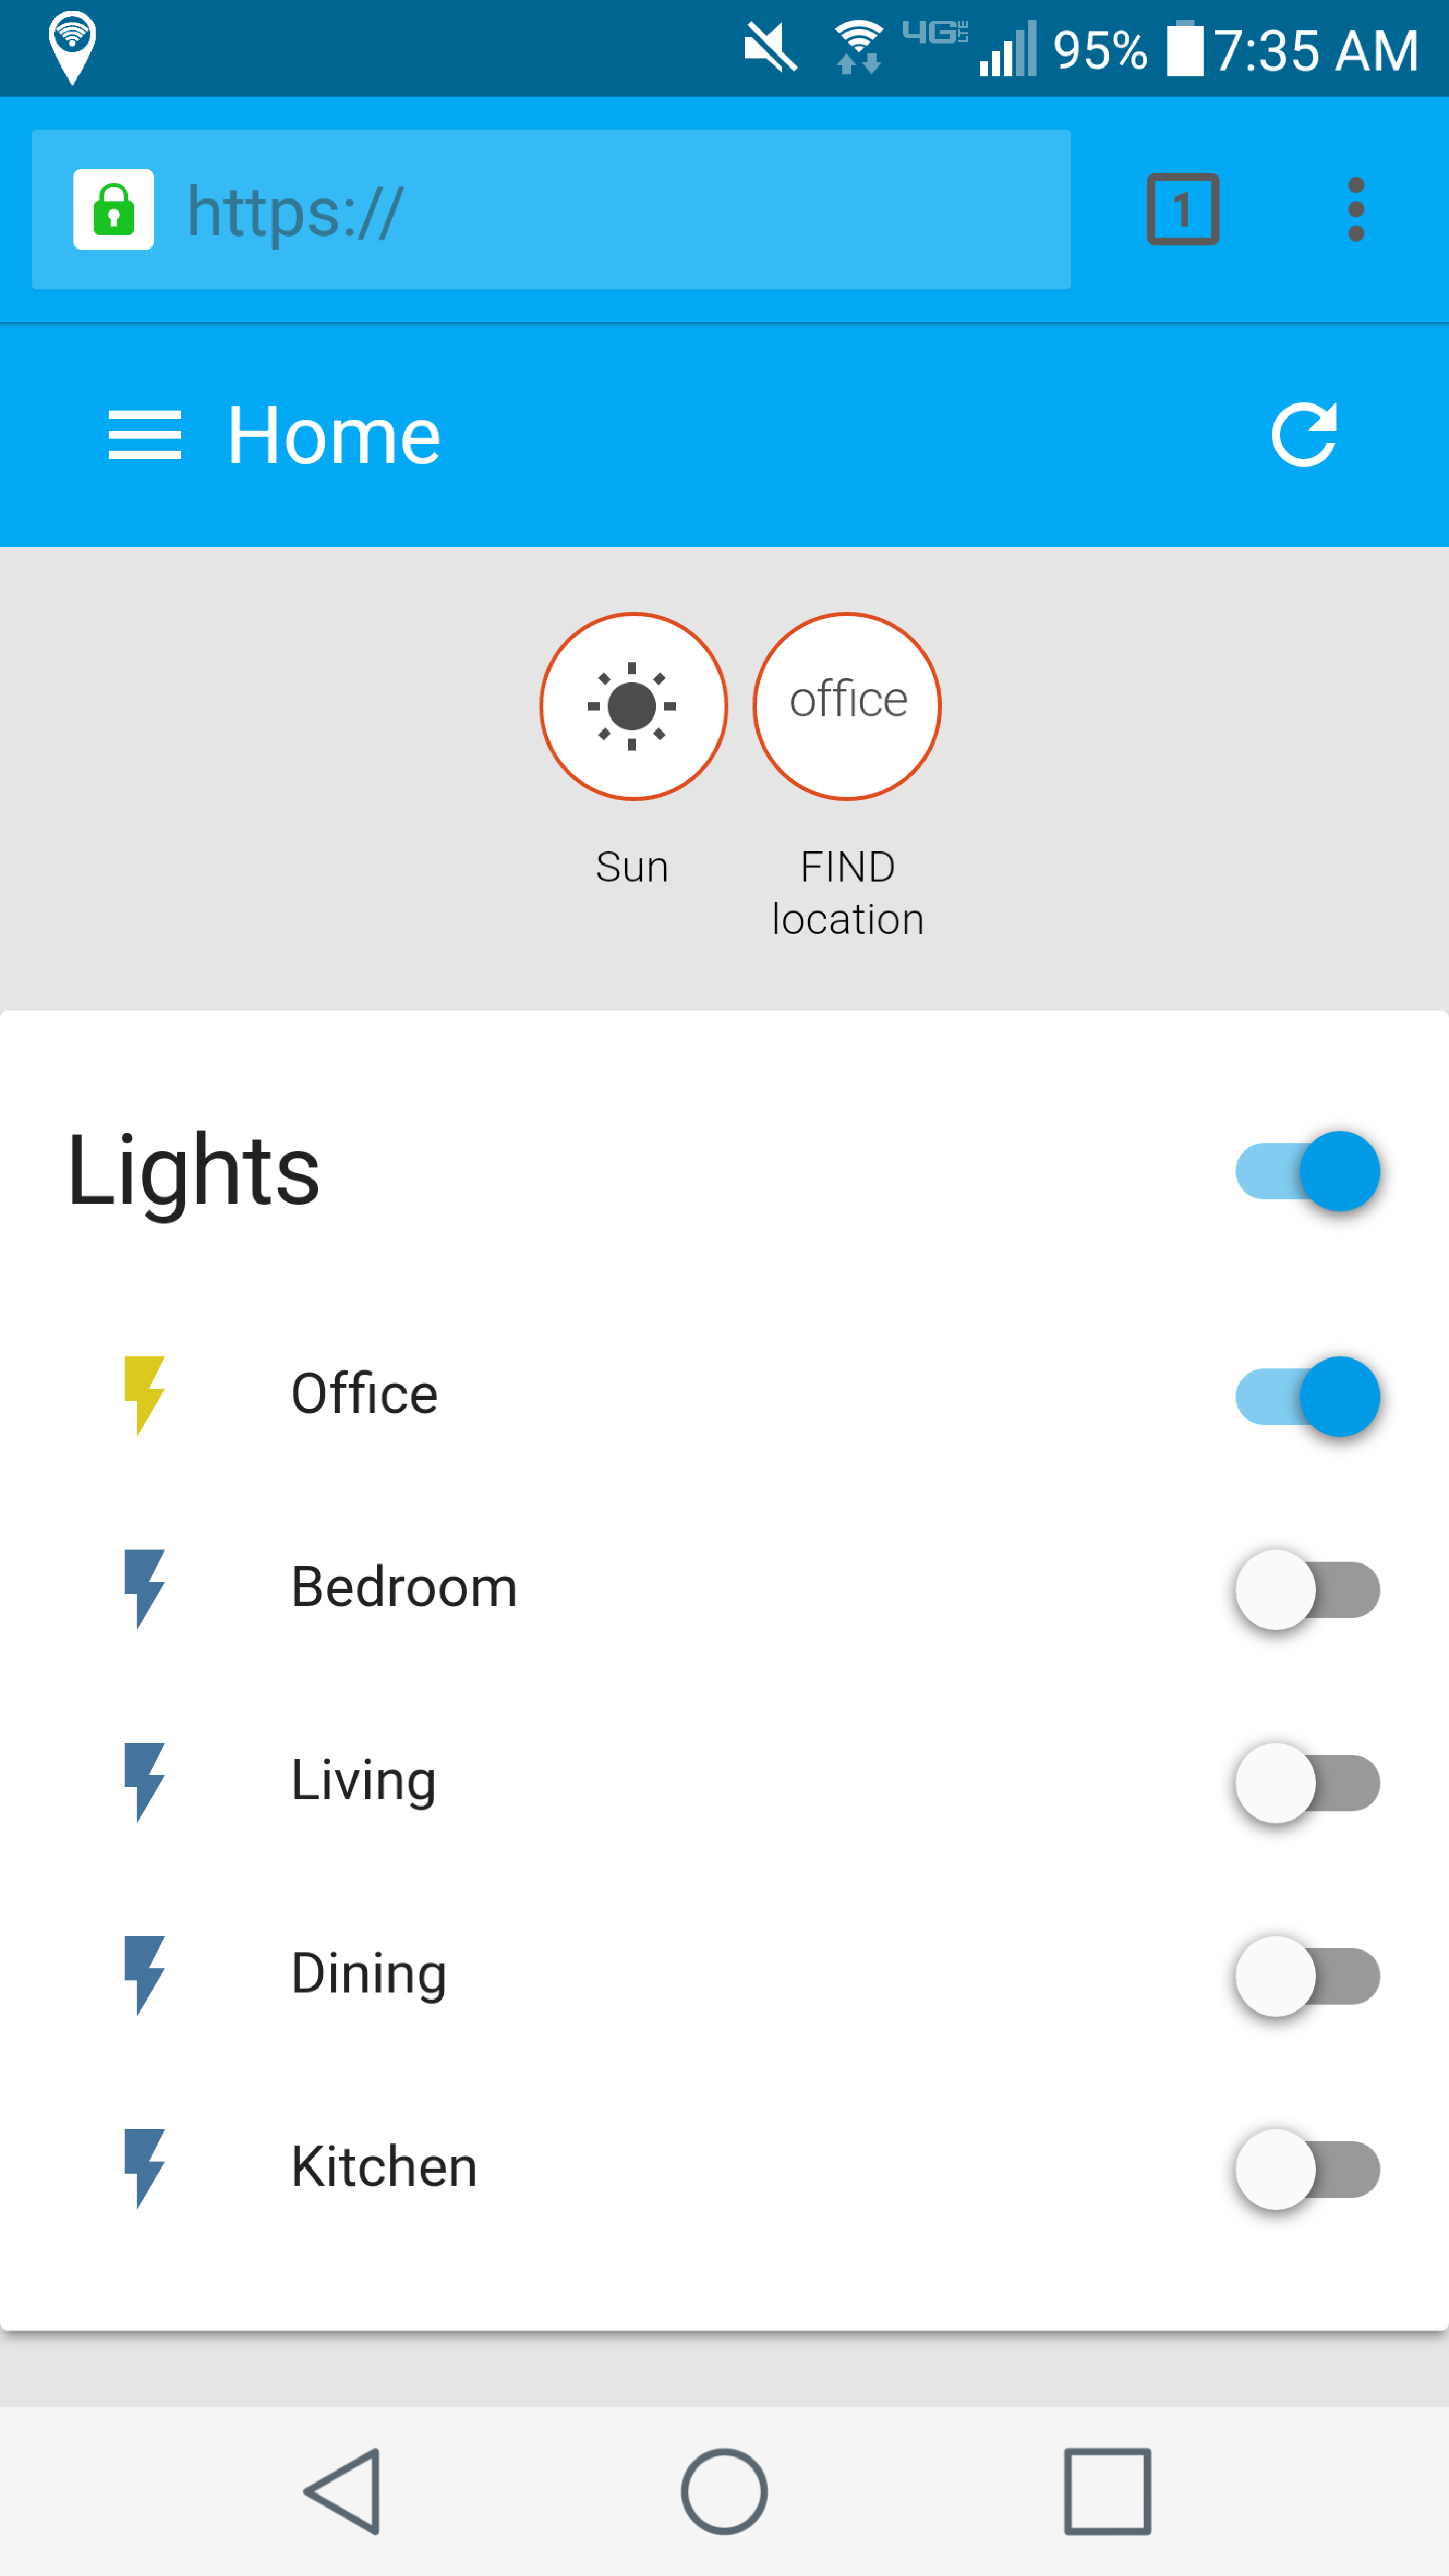
Home Assistant is an excellent framework for tracking the state of devices in your home, and can control them from a single interface.
I’ve created a example template file for home assistant that can be used with FIND:
- HTTP-based communication
- MQTT-based communication (coming)
Here’s an example of my screen using the system:
Particle Photon
The Particle Photon is a $20 device that can be used as a tracking device using the following code. The code allows for a “sleep” mode that can be activated by pressing “Setup” once, and turned off by pressing “Setup” twice. This mode allows more battery life.
You can access the FIND program using HTTP or MQTT. I’ve included example sketches that can be used for each.
HTTP-based messaging
Some notes:
- You must use HTTP, not HTTPS. That’s why the server is set to
ml2.internalpositioning.com - You can not flash from WiFi is the board is in sleep mode. Thats what the button is for. If this fails, you can reset by unplugging, holding down “Setup” and then plugging in while holding down “Setup.” Then link up the Photon like you did from the beginning.
- The Photon ESP chip sees fewer macs than a Android does, probably because of the antenna. Thus, its best to not use platform-specific information and you should set the mixins to
0on the server by usingcurl https://ml.internalpositioning.com/mixin?group=X&mixin=0.
MQTT-based messaging
This version uses significantly less bandwidth than the HTTP version. It takes a little more configuration, see the MQTT documentation for how to get started with MQTT.
Benchmarking
Using a nextTime of +2000ms it uses 147 mA.
Using a nextTime of +5000ms, it uses 113 mA.
Using a nextTime of +10000ms, with SLEEP ACTIVATED, it uses 81 mA
Using a nextTime of +60000ms, with SLEEP ACTIVATED, it uses 57 mA